Kickstarter: Rigiet – A Stabilizer for your Smartphones

The iPhone is one of the most popular cameras in the world, so there is no shortage of ways to make it more versatile. With a new Kickstarter campaign, the Rigiet is looking to make shooting video smoother.

Shooting video by hand works great if you’re standing still, but when you start moving, video quickly gets shaky, and even nauseating. The Rigiet – a new Kickstarter project – is designed to take out the shake of your moving video, and enable you to shoot smoother video much more affordably than the competition.

What is Rigiet?

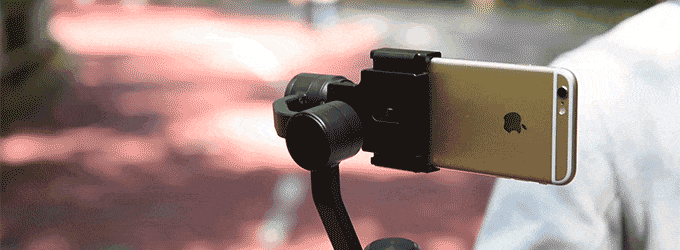
The Rigiet is a stabilizer – or Gimbal – for your iPhone, Smartphone, or GoPro (with adapter), using a combination of weight and small motors to balance your device and keep it level while you shooting videos or photos. Additionally, it offers a simple joystick for controlling the pan and tilt of the camera.

Rigiet supports a smartphone in landscape orientation, which really is the only acceptable way to shoot video. Rigiet also works in portrait mode, which works for Facetime or live streaming, if that’s your thing. Unlike many other gimbals on the market, Rigiet can also be used in the “underslung” position, without needing to stop recording. check out: facetime android apk

rigiet-normal to underslung gif

The Rigiet device also offers Bluetooth to pair with their app, which enables mode switching (photo, video, slow mo, time lapse, and panorama), as well as a record button to start and stop video in the app, and a toggle for front/rear camera selection.

With that, Rigiet does require power. The pre-production model I received had 2 batteries in the box – but the device only requires one. The battery is non-standard, but can be charged via the device over microUSB. In my testing, a charge of one battery easily covered me for a few hours of shooting. A second microUSB port near the head of the gimbal also allows for pass-through power and charging of your smartphone, enabling you to recharge your device as you shoot.

How does it work?

First things first. You’ll need to charge the batteries – or at least I did –  since the included batteries were dead when it arrived. Second, either download the Rigiet app or get ready to fire up your favorite video app.

Once the Rigiet is charged, you’re ready to get setup. Open the mount, slide your iPhone in, and close the mount. Using a little trial and error, get the phone and counterweight in balance. Once this is done, make sure the clamp is secure.

As a note, balancing the Rigiet required me to tape a couple nickels to compensate for the iPhone 7 Plus weight. If you’re using a lighter weight device, you shouldn’t need to do this, but for me, it was the only way to balance the device before getting started. It did work without the weights, but had a very slight tilt without the added nickels.

Once things are balance, press and hold the power/shutter button to power on device. When the motors engage, you’ll see and feel a little bump as things lock in place. From here, you can fire up the Rigiet app or another video app, and you’re ready.

man holding rigiet in air

It’s a pretty cool tool. Video while walking was noticeably smoother, going down stairs appears as a glide, and pans and tilts were smoother and consistent. In my testing, the record button only worked with the Rigiet app, which is fine because there are some bonus features in there, anyway.

Within the app, there are modes for motion time lapse (affix the Rigiet device to a tripod, set start and end points, and watch it move automatically), multi-shot panorama (again, tripod required), and the standard time-lapse, slow motion, video, photo, and traditional panorama modes.

All-in-all, the Rigiet is a pretty cool device, and for the price, it’s a solid option for aspiring videographers. Check out their Kickstarter, and let me know what you think in the comments section.

from Ian Fuchs – MacTrast

Review: Mosaic – Simple Window Management for Mac

I have been a Mac user for more than 10 years, and while many things have changed about what I use the Mac for, and how I do my work, one thing has remained consistent – I always move app windows so they line up nicely without overlapping whenever possible. It is tedious, and probably somewhat OCD of me, but I like seeing everything lined up and positioned so I can easily switch from app to app without diving to the dock or doing a ⌘-tab to switch around. Thankfully, Mosaic – a new Mac utility – is here to save the day.

Overview

Mosaic by Light Pillar Software is a simple Mac utility that allows you quickly resize and reposition apps on your desktop. Using either keyboard shortcuts, drag and drop, or even the Touch Bar, apps can be positioned consistently and conveniently to allow for a great aesthetic or a functional working space.

Mosaic App Dialog
Currently available in two different pricing models, Mosaic can be purchased from the Light Pillar website, or as part of the Setapp subscription catalog.

Using the app is super simple. After getting things setup (allowing accessibility permissions for the app to allow placement and sizing), grabbing any app window and dragging it presents you with a a dialog box across the top of your screen. Simply drag your cursor over one of the sizing options, and BOOM, the app is perfectly positioned.

Mosaic Grid Menu
Being one to tinker, I personally adjusted this setting so the option key must also be pressed before the dialog appears. The ability to adjust these settings to better suit your needs is great in Mosaic.

Other options, like “Click and Select” allow a keyboard shortcut to present a layout picker for the currently active application. It also allows for quick access to custom layouts, where you select a section of a grid size the application. This quick customization is fun, and can be useful for larger window apps (like a web browser).
Mosaic Group Menu
Unlike Apple’s current approach to fullscreen multitasking applications (with their full screen and 2 up views), Mosaic doesn’t require the app to support special full screen or side-by-side, but simply needs to be resizable. And if an app can’t be resized, a simple notification lets you know “Hey, something couldn’t be resized because reason“. It’s a delightful experience.
Mosaic Layout Menu
The other big benefit of Mosaic vs the built-in macOS variant is the ability to have 3, 4, 5, or more apps all designated in their appropriate spaces without overlapping or needing to swipe through spaces. On a giant 27″ 5K iMac, this actually feels usable. Huge kudos to the folks at Light Pillar for one-upping Apple.

Another great feature of Mosaic is the ability to create your own custom layouts. For me, the first thing I did was make a three-section layout for Tweetbot, Messages, and Slack (since I often bounce around those three when I’m not doing actual work).

Mosaic Custom 3 App Layout
I also setup one for work, specifically to set a browser to ~72% of the screen (5/7), and ~28% for my Remote Desktop client (2/5). Making this layout pairing, and adding it to my group menu has likely saved me 30 minutes in the past month (did I mention this was an OCD thing for me?).

Other great features of Mosaic include a quick positioning option (moving an app to any side or corner of the display without resizing), and options for screen shotting the selected window and saving it to your desktop (or wherever you choose), or grabbing a screen shot and copying the image to your clipboard. These “extra” features are great power user tools, and are super convenient (for me, at least).

Mosaic Quick Grid
The only feature I find currently missing (one I hope the developers add) is an “auto-arrange” that puts all the currently active apps in a pre-determined position. This would save the step of click and drag, and enable a simple keyboard shortcut or click of the mouse to move all my apps to their assigned locations.

Verdict

Mosaic is a delightful utility that solved a problem that I didn’t know NEEDED solving. It has improved my efficiency on my computer by enabling me to spend less time fiddling and more time actually working. As I use it more and more, I find that I miss it when I’m on a computer that isn’t mine. For being a third party application, it feels like a native part of macOS, and I can only imagine it getting better from here!

Rating: 4.0/5.0

Pros:

  • Custom layout templates
  • Easy to use
  • Screen capture & quick layouts

Cons:

  • No auto-layout feature (yet)

If you’re anywhere near as fiddly as me when it comes to the layout and organization of apps on your Mac, Mosaic is hands down a fantastic utility to check out! Get it today from Light Pillar or with a Setapp subscriptions


Disclaimer: This review was not paid for by the developer. Light Pillar did supply a complimentary copy of the app. All thoughts and opinions are my own.

from Ian Fuchs – MacTrast

First Impressions: Hands-On With Google Glass – The (Possible) Future of Mobile Computing

We all know (and if you don’t, SHAME!) of Sonny Dickson.  He’s the guy that leaked several dozen photos of the new iPhones and iPads this past fall (with near perfect accuracy, I might add).  Not only is Sonny a super sleuth when it comes to connections in Apple’s production line, he’s also been kind enough to get us, at MacTrast, into the Google Glass Explorer program.

Glass-artsy

After getting invited to join the program, we thought it would be fair to share with all of you, what Google Glass is all about.  Today, we’ll take a look at what comes in the box, and I’ll give a few of my initial impressions.

Before I get to that, though, I will remind all of you that Google Glass is currently in a sort of quasi-open beta program.  Those allowed early access to the product are selected on a invitation basis, and have only seven (7) days from receiving their invite to order their Glass.  I would venture to guess that there are between 10,000 and 20,000 explorers out there right now, but I could be way off (Google didn’t seem to have any real solid numbers publicly available), and that number is growing as Google is in the midst of opening their second string of invites.

Enough about the technicalities though – head over to MacTrast.com for all the juicy details!